Get the latest interview tips,Job notifications,top MNC openings,placement papers and many more only at Freshersworld.com(www.freshersworld.com?src=Youtube). Interior Designers are highly creative…
RV Roof Repair – part 1

Starting the motorhome roof repair.
roofing repair NJ
Benefits Of Carpet Over Tile
Are you considering choosing tile over carpet or vice versa. If you are, you might be interested in this article. It will give you some tips that you might find useful in making your decision. Keep reading and learn about the benefits of carpet over tile.
Carpet has many benefits over tile. For example, carpet is much warmer in the winter time. There is no worse feeling than stepping on a tile floor on a winter morning. Carpet is warm to the touch and is much nicer to walk on when the weather gets cold. Carpet also has a soft feel. This is especially important if you have children. There is one thing that all young children do and that is fall. Would not you rather they fall on a nice and soft carpet instead of a hard tile floor. They will be much less likely to be injured. Another advantage of carpet is that not everyone likes tile so you might hurt your resale value. Ceramic tile is great in kitchens and baths but many people do not like it in living areas. It just does not have the appeal that other floorings have like wood or stone. The final advantage of carpet over tile is the cost. You can get a great long lasting carpet for much cheaper than the cost of tile. Use the money you saved to go on vacation or update some other part of your home.
As you can see, there are a number of benefits to choosing carpet over tile. See if they make sense to you and decide for yourself whether carpet or tile is for you. Good luck with your decision.
Cheap Fix-Trailer roof repair

I find a HUGE crack in my cargo trailer roof. I use a couple different methods to fix the roof and it came out pretty good.
roofing contractors nj
Interior Design Walkthrough of Mr. Sriharsha & Manaswini’s House | Nagarjuna Meadows | Bangalore
Foyer Design The foyer is lined with a white and copper finished stone cladding and lit from the above with spot light and it strongly demands its share of attention.Well complimenting…
Leaking Roof Vents Repair
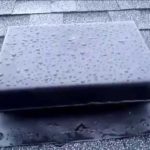
My roof vents were leaking slightly due to some high winds and really heavy rains. I used aluminum screen material folded over it self for strength and then bent to fit. I’m hoping it his this…
NJ roofing
How to Properly Prepare For Successful Concrete Floor Coating Installation
One of the critical elements for achieving ideal results with a concrete floor coating is proper preparation of the concrete surface. This may sound elementary, but it’s surprising how many flooring contractors don’t actually follow the protocols that optimize results and customer satisfaction.
It’s not just the preparation phase that makes a difference. There are fine points all along the way that make a huge difference in the outcome. The following steps should be followed for optimal results:
- Determine Floor Type – Not all concrete floors are the same. Is the existing concrete soft, medium or hard? Understanding what’s already there is the foundational step for everything that follows.
- Select the Right Grinding Methodology – The two main approaches are:
Shot Blasting – Most contractors use shot blasting because it’s the cheaper way to go. However shot blasting is often too aggressive an approach, and is usually more appropriate for resurfacing rather than for applying a thin film. Shot blasting is downright abusive to concrete and can create stress fractures in the floor. No matter how carefully it’s done, it also creates pits and valleys, high spots and low spots. When it comes to coatings such as urethane and epoxy, diamond grinding is usually the better approach.
Diamond Grinding is a preferred prep method for a variety of reasons. Many contractors don’t it because it requires more time, money and skill. But the most important part is getting the coating to bond to the underlying floor, and diamond grinding is the best way to thoroughly open the pores of the concrete throughout the floor without damaging or gouging the concrete. It also produces the smoothest most uniform finish, thereby producing the best and most long-lasting result. The precision tooling of a diamond grinder also allows a trained technician to select the exact proper cutter for a specific floor, again minimizing damage or gouging to the underlying concrete. - Hand Grind All Edges – Most contractors don’t bother with this detail. They figure their industrial grinders get “close enough.” But without hand grinding the final few inches all the way to the walls, there’s no assurance that the coating will properly bind to the concrete at the edges… and that can mean a shoddy result.
- Thorough Cleaning – Once the grinding is complete, the floor must be meticulously swept and vacuumed – all the way to the edges — so that no residue remains that could interfere with complete bonding.
- Coat- Apply the first layer of the coating, such as an epoxy primer specifically formulated for penetrating and bonding to the concrete. Usually 3-5 mls in thickness.
- Second Layer – Apply the build coat of the epoxy, usually 8-10 mls in thickness.
- Sanding – For optimal bonding, both a chemical bond and a mechanical bond are ideal. This is why Liquid Floor Systems chooses to sand this epoxy layer, though not everyone bothers with this additional step. Is it absolutely necessary? Maybe not. Does it produce the best and most long lasting result? Absolutely!
- Thoroughly Clean After Sanding
- Apply Urethane Top Coat. The most important element of this final step is to roll on the urethane within the “recoat window “for complete bonding between the epoxy and the urethane.
If each of these steps is performed by experienced concrete floor coating professionals, an epoxy floor with a urethane seal is one of the most attractive, long-lasting and cost effective concrete floor coating options available.
Toronto Roof Repair – Attic Vent, Shingle Repair & Tar Paper Repair 1/2
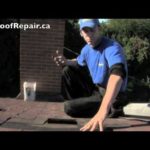
The roof repair specialists http://www.mrroofrepair.ca show what causes common attic leaks and moisture. When the shingles are not sealed properly, this is will cause water to leak into vents…
NJ roofing
Interior Design — Elegant & Traditionally Designed Small Apartment
On http://houseandhome.com/tv, designer Scott Yetman downsized into his 1400-sq.-ft. apartment as a temporary space — 15 years ago. See how he gave a stopgap home the feeling of his own…